Crypto Mining With Raspberry Pi: A Guide
From installing a server to selecting your cryptocurrency, here’s how to start earning crypto with your Raspberry Pi.
5 STEPS TO MINING CRYPTO WITH RASPBERRY PI
- Install an Ubuntu server on your Raspberry Pi to start mining.
- Select the cryptocurrency you want to mine.
- Choose a wallet for your cryptocurrency.
- Execute the necessary code to run the miner.
- Track your progress.
I used Ubuntu server 20.04.3 long-term support (LTS), which supports Raspberry Pi 3, 4 and 400 on the 64-bit version, and an old Raspberry Pi 3 Model B revision 1.2 that I had lying around.
I am going to mine Duino-Coin, which is a coin that can be mined with an array of technologies, including Arduinos ESP8266/32 boards, Raspberry Pis and computers, as well asWi-Fi routers, smart TVs, smartphones, smartwatches, single-board computers (SBCs), microcontroller units (MCUs) and graphics processing units (GPUs).
How to Set Up Your Raspberry Pi to Crypto Mine
Installing Ubuntu on the Raspberry Pi is a very straightforward process. You can find detailed documentation on the Ubuntu website.
After the installation and boot of Raspberry Pi, we can log in with secure shell protocol (SSH) and should be presented with the Ubuntu server start screen:
We can even see the temperature of the Raspberry Pi. Mine seems to be at 45 degrees Celsius just after boot.
Set Up Your Cryptocurrency
To set up Duino-Coin, all you need to do is follow these commands. We start by installing all the dependencies:
Then we can clone the Duino-Coin repository:
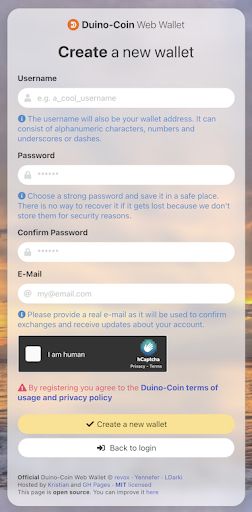
We also need to generate a wallet where our mining profits are going to be added. Duino-Coin has a few wallet options, including a graphical user interface wallet, a command line interface wallet and a web wallet.
I chose the web wallet because it has additional features, like the ability to view your miner stats and calculate estimated profits.

Create a new Wallet on Duino-Coin Web Wallet. | Screenshot: Nuno Bispo Start Crypto Mining With Raspberry Pi
To run the miner, we need to execute the following command:
On the first run, the script will ask for the following configuration:
- Wallet Username: This is what you created in the previous step.
- Mining Intensity: Normally it’s 95 percent but if you aren’t using the Raspberry Pi for something else, you can go up to 100 percent.
- Mining Threads: This depends on your Raspberry Pi hardware. Mine has four cores, so I chose four threads.
- Mining Difficulty: For the Raspberry Pi, a low setting is recommended
- Designate a Rig Name: You can choose not to add a name, but I suggest using a name so you can easily track your stats.
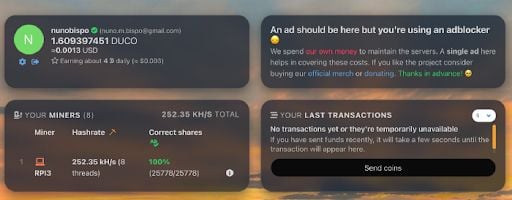
Track Your Mining ProgressYou can go to your wallet to check your miner stats:

GUI Wallet shows my stats after a couple of hours. | Screenshot: Nuno Bispo As you can see, after a couple of hours, the results are not a million dollars but an estimated $0.003 daily.
Keep in mind, however that this is an old Raspberry Pi 3. New models like the Raspberry Pi 4b can produce up to 1.75 MH/s, compared to my ridiculously low 252.35 KH/s.
While I might not get rich, it took me less than five minutes to start mining and I had an extra Raspberry Pi. It’s a nice, slow-growing side income with little effort. Maybe in a year, I’ll be able to afford a nice coffee.
Crypto mining is a hot topic in the world of technology and finance. Raspberry Pi offers an inexpensive entry point for those looking to start making money through cryptocurrency.
While it’s not as powerful or efficient as some more expensive solutions, it can still provide you with a steady stream of income.
tested and working as of 10-26-2022 on a raspberry pi3b plus
waiting for verification from the coin wallet provider to start mining.
the power light goes off and the green light blinks when its mining.
follow up later after verification.
my settings were low and 4 threads upon the initial run and no master key is set.
one of the quickest installs and runs that actually worked without errors.
de ka8pog Phillip


No comments:
Post a Comment